

Healthier Homemade
- Alex Brandy

- Jul 24, 2021
- 7 min read
Ah, convenience. Short cuts, time savers, things that are easier, no thinking involved. It is a beautiful thing to give up on time spent cooking and preparing and just bring in take-out or buy it already made from the grocery store. Foods like, salsa, yogurt, granola, pie crust, flavored popcorn, spice mixes, chicken stock, ketchup, potato chips, etc. But the more we can make food items homemade, the more money we save and the more control we have over the ingredients.

This month we will look at how convenient, easy, and healthier it is to make your own than to buy some of these items already prepared. Keep in mind the time is the same. Going to the grocery store to shop, wait in line to pay and drive back home, unload the groceries, and put everything away is essentially the same time it takes to buy the ingredients at your once per week shopping trip and make the items yourself.
Salsa, Pico de Gallo, tortilla mix: Whether you roast your tomatoes or use them cold, whether you sauté your onions or use them freshly diced, these condiments are super easy to help create fresh vegetable condiments/mixes. Remember, anything already packaged has preservatives and additives. Have you ever noticed the expiration date on the pre-made condiments? It is very rare that you will see freshly packaged veggie mixes because it is the store’s way of using almost expired produce before it becomes wasted. When you make it from scratch, you also control the expiration date simply by using what you made more often. Freshness lasts longer.
Good: Buy it already made with the longest expiration date possible. Use right away.
Better: From the authors of Eat This, Not That, All Natural Desert Pepper Trading Company, Peach Mango Salsa medium spice

Buy it shelf stable from a jar or can and use when you are ready but use the entire jar or can right away after opening.
Best: Make it fresh from ingredients you can buy fresh.
Pico de Gallo is another version of salsa. To make it fresh and steer clear of preservatives, a basic recipe includes fresh tomato, medium onion (red or white), jalapeno, fresh cilantro, lime juice, salt and pepper. To bulk up the basic recipe add diced colored peppers, cucumber, and fruit. To make it more of a meal add fish or chicken over rice.

Popcorn and potato chips: Ever take a minute to check the ingredient list on packaged popcorn and potato chips? Even if the name of the item says it is the healthiest version out there, if it is packaged and pre-made it is loaded with preservatives and additives and unnecessary salts and derivatives of salt. Not to mention, movie theater butter style popcorn could easily be 500+ calories per serving! Here are some better options:
Good:

Buy already packaged air-popped popcorn like Skinny Pop Popcorn and potato chips.
Better:

Buy plain microwave popcorn and pop it yourself and add flavor.
Best:

Buy unflavored kernels of popcorn, pop according to instructions and lightly season.
To make a healthier flavored popcorn, use popping corn kernels, a ¼ cup is all you need. Put the ¼ cup kernels into a paper bag and microwave for 2-3 minutes. Once popped season to your taste. You can use Parmesan cheese, hot sauce, cinnamon, or for a salt free option would be garlic and herb from Mrs. Dash. YUM!
If you have an air fryer you can make your own potato chips by thinly slicing a potato, cooking it per your air fryer's settings, and again season to your personal taste.

Spice Mixes: What would we do without spices? They are the flavor enhancers or the flavor itself for a good portion of our food palette. Most store-bought spices contain salt, and we all know by now how detrimental to our overall health too much salt can be. Spices, combined, make new kinds of flavors, and are a foodie’s version of artistry.
Good: Buy the spice mix already combined
Better: Find salt-free blends by brands like Mrs. Dash
Best: Make the spice mix using all of your own spices combined to a flavor you enjoy and preserve for another use.
Think you cannot make a Mexican seasoning blend? Oh yes you can and without all the processed salt. Here is the recipe: Mix together and preserve.
1 teaspoon chili powder
1 teaspoon garlic powder
1 teaspoon onion powder
½ teaspoon crushed red pepper flakes
½ teaspoon dried oregano
2 teaspoon paprika
1-1/2 teaspoon ground cumin
½ teaspoon sea salt
½ teaspoon black pepper
1 pinch cinnamon
1 pinch ground cloves

Granola: Confession: I am addicted to my own granola recipe than to any store-bought granola I have ever purchased. Sometimes convenience in pre-made isn’t worth the money or the after taste. The thing about homemade granola is that every ingredient is in its purist form, and nothing goes into the mix that you don’t decide to put in it. You can experiment with different add-ins each time you make it, and the granola can be made sweet without sugar or brown sugar or made savory. It is up to YOU.
Good: According to Eat This, Not That, this brand won overall for the least amount of preservatives and lower calorie count per serving.

Buy already made granola mixes like Nature Valley
Better: Buy flavored oats and add your own nuts and dried fruits
Best: Make your favorite granola from scratch starting with the pure rolled oats (not from instant).
Homemade Granola:
Using a base of 3 cups of rolled oats, try this recipe:
3 cups rolled oats
½ cup sugar free cinnamon apple sauce
2 teaspoons cardamom
2 teaspoons cinnamon (or more if you prefer)
2 teaspoons allspice
2 teaspoons nutmeg
¼ teaspoon of salt (optional) but it does help bump up the other spices
2 tablespoons olive oil (optional)
3 tablespoons honey (or more if you prefer but this counts as a natural sugar)
Nut mix ins: your choice but add them here before baking the granola
When cooled, add chocolate or cinnamon chips, dried fruit or dehydrated fruit
Bake granola mixture at 350 degrees for 20 minutes, mixing the granola after 10 minutes. If not toasted enough to your liking, add 5 minutes at a time, mixing granola each time.
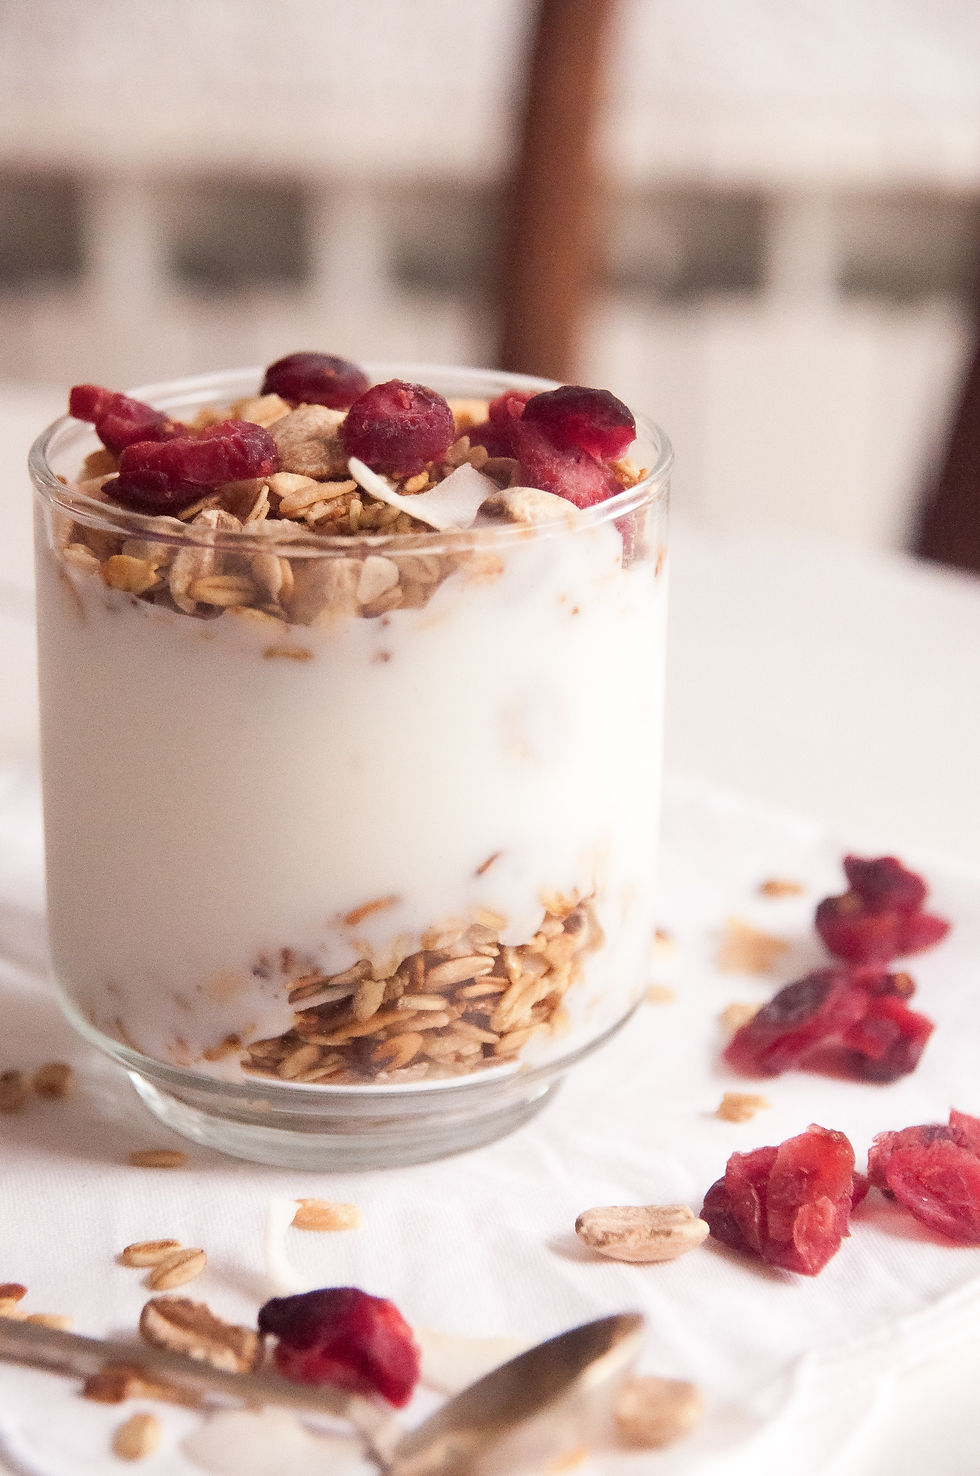
Yogurt: Depending on the milk you use and the kind of yogurt you like, homemade yogurt can cost 60-80% less than store-bought yogurt. All you need is your favorite yogurt and the milk of your choice. Eventually the favorite store- bought yogurt will be gone and all you will have left is the yogurt you made plus your favorite milk. All you need is time and your favorite flavor mix-ins.
Good: Store bought yogurt with or without fruit. Yogurt cancels its goodness and nutrition when the sugar content goes up due to manufacturer add-ins. Please check the sugar count before purchasing. Any yogurt sold where the sugar is higher than 6 grams is not a healthy option.
Better:

Store bought Greek yogurt plain, no fruit added. Two Good claims only 2 grams of sugar even with fruit on the bottom. You decide.
Best: Make your own yogurt and control the sugar, fruit and other mix ins.
How to make your own yogurt: Courtesy of thekitchn.com
1. Heat the milk. Pour the milk into a Dutch oven and place over medium to medium-high heat. Warm the milk to right below boiling, about 200°F. Stir the milk gently as it heats to make sure the bottom doesn't scorch, and the milk doesn't boil over. According to the National Center for Home Food Preservation, this heating step is necessary to change the protein structure in the milk so it sets as a solid instead of separating.
2. Cool the milk. Let the milk cool until it is just warm to the touch, 112°F to 115°F. Stir occasionally to prevent a skin from forming. (Though if one does form, you can either stir it back in or pull it out for a snack!) You can help this step go faster by placing the Dutch oven in an ice water bath and gently stirring the milk. 3. Thin the yogurt with milk. Scoop out about a cup of warm milk into a bowl. Add the yogurt and whisk until smooth and the yogurt is dissolved in the milk. 4. Whisk the thinned yogurt into the milk. While whisking gently, pour the thinned yogurt into the warm milk. This inoculates the milk with the yogurt culture. 5. Transfer the pot to the (turned-off) oven. Cover the Dutch oven and place the whole pot in a turned-off oven — turn on the oven light or wrap the pot in towels to keep the milk warm as it sets (ideally around 110°F, though some variance is fine). You can also make the yogurt in a dehydrator left at 110°F or using a yogurt maker. 6. Wait for the yogurt to set. Let the yogurt set for at least 4 hours or as long as overnight — the exact time will depend on the cultures used, the temperature of the yogurt, and your yogurt preferences. The longer yogurt sits, the thicker and more tart it becomes. If this is your first-time making yogurt, start checking it after 4 hours and stop when it reaches a flavor and consistency you like. Avoid jostling or stirring the yogurt until it has fully set. 7. Cool the yogurt. Once the yogurt has set to your liking, remove it from the oven. If you see any watery whey on the surface of the yogurt, you can either drain this off or whisk it back into the yogurt before transferring to containers. Whisking also gives the yogurt a more consistent creamy texture. Transfer the yogurt to storage containers, cover, and refrigerate. Homemade yogurt will keep for about 2 weeks in the refrigerator. 8. Your next batch of homemade yogurt. Once you start making your own yogurt, you can use some of each batch to culture your next batch. Just save 1/2 cup to use for this purpose. If after a few batches, you notice some odd flavors in your yogurt or that it's not culturing quite as quickly, that means that either some outside bacteria have taken up residence in your yogurt or that this strain is becoming weak. If this batch still tastes good to you, it will be safe to eat, but go back to using some store-bought commercial yogurt in your next batch.
RECIPE NOTES
Cost breakdown: We eat about a quart of yogurt a week in our house, which was costing roughly $2.60 a week. A half-gallon of milk makes a little less than two quarts of yogurt, which has been just enough to last us two weeks. We buy a local brand of milk that costs $3.70 per half gallon ($1.85 per quart), so we end up saving about 75-cents per week on yogurt. Nice.
Holding the temperature: If your milk drops below 110°F while it's incubating, that's fine. It will take a little longer to set and might end up a little looser, but the bacteria in the yogurt culture will keep the milk from spoiling. By the way, even after 8 hours in the oven (overnight), our yogurt made in the Dutch oven still usually registers about 100°F when I take it out of the oven!
Homemade Greek yogurt: You can make Greek-style yogurt by straining your homemade yogurt until it is as thick as you like.


Comments